Shibesh Getahun Official Wabsite
- Get link
- X
- Other Apps
My name is Shibesh Getahun I was born in 1991 June 10.
My father is Getahun Kusa and My mother na is Konjit Anjulo


I am schooled
1-8 in Guducho primary school and after that 2007 E.c I am Grade 9 and go to Gara Godo Secondary and preparatory school 2007-2010E.cafter that 2011E.c Werabe University Institute Of Collage
INFORMATION TECHNOLOGY STUDENT


Definitions of computer
Information Technology 
What is Information Technology?
Information technology falls under the IS umbrella but deals with the technology involved in the systems themselves. Information technology can be defined as the study, design, implementation, support or management of computer-based information systems.
Information technology is the use of computers to create, process, store, retrieve, and exchange all kinds of electronic data and information.
Information technology (IT) is the use of any computers, storage, networking and other physical devices, infrastructure and processes to create, process,
Information technology (IT) is the use of computer systems or devices to access information. Information technology is responsible for such a large portion of ...
computer


What is a Computer?
A computer is a programmable device that stores, retrieves, and processes data.
A computer is a digital electronic machine that can be programmed to carry out sequences of arithmetic or logical operations (computation) automatically.


What is a Computer? (Definition & Meaning) - Webopedia
23/07/2010 · Personal computer: A PC is a small, single-user computer based on a microprocessor. In addition to the microprocessor, a personal computer has a keyboard for entering data, a monitor for displaying information, and a storage device for saving data. Workstation: A workstation is a powerful, single-user computer.
- Estimated Reading Time: 5 mins
EXPLORE FURTHER
computer- an electronic device for storing and processing data, typically in binary form, according to instructions given to it in a variable program.
- a person who makes calculations, especially with a calculating machine.
- an electronic device for storing and processing data, typically in binary form, according to instructions given to it in a variable program.
- a person who makes calculations, especially with a calculating machine.
How to Install Ubuntu Virtual Machine on Windows
There are quite a few ways you can install Ubuntu on your Windows PC. You can always wipe it entirely and install Ubuntu, thus losing the Windows part of your PC. You can install Ubuntu in a dual boot set up that lets you choose between Windows or Ubuntu at the time of boot. Thanks to Microsoft’s efforts you can now also install Ubuntu on your Windows 10 PC via the Microsoft Store now. However, this will only install a command-line version with all the command line tools and utilities. Of course, Redmond won’t want to help you in switching the OS entirely. Another popular way of doing installing Ubuntu is in the form of an Ubuntu virtual machine.
There are quite a few ways you can install Ubuntu on your Windows PC. You can always wipe it entirely and install Ubuntu, thus losing the Windows part of your PC. You can install Ubuntu in a dual boot set up that lets you choose between Windows or Ubuntu at the time of boot. Thanks to Microsoft’s efforts you can now also install Ubuntu on your Windows 10 PC via the Microsoft Store now. However, this will only install a command-line version with all the command line tools and utilities. Of course, Redmond won’t want to help you in switching the OS entirely. Another popular way of doing installing Ubuntu is in the form of an Ubuntu virtual machine.
Check Out these Surround Sound Speakers!
There are some advantages and disadvantages to this method. First, if you install Ubuntu as a virtual machine, you don’t have to make any permanent changes to your computer. It is basically like installing a big AAA game, only a little more complicated. You can uninstall it just as easily as you uninstall another app. However, this means you’re running an operating system, within an operating system. Windows 10 is already using up your RAM and processor power, and when you run the Ubuntu virtual machine that too will need some resources and RAM. Therefore, this isn’t exactly an ideal solution if you want to use Ubuntu for some serious work. If your usage of Ubuntu is only very limited an Ubuntu virtual machine is perhaps the most comfortable choice.
There are some advantages and disadvantages to this method. First, if you install Ubuntu as a virtual machine, you don’t have to make any permanent changes to your computer. It is basically like installing a big AAA game, only a little more complicated. You can uninstall it just as easily as you uninstall another app. However, this means you’re running an operating system, within an operating system. Windows 10 is already using up your RAM and processor power, and when you run the Ubuntu virtual machine that too will need some resources and RAM. Therefore, this isn’t exactly an ideal solution if you want to use Ubuntu for some serious work. If your usage of Ubuntu is only very limited an Ubuntu virtual machine is perhaps the most comfortable choice.
Requirements
We’ll try to make the process of installing an Ubuntu virtual machine a little easier for you. But there are a few things you will require before you can start.
- Virtual machines can be created using software tools designed for this. Some of the popular options include VMware and Virtual Box. In this tutorial, we will be using Virtual Box because it’s free and open-source just like Ubuntu. Also, it’s better. You can download it using the link in the Downloads section below.
- You’ll of course also need a copy of Ubuntu to install Ubuntu. Ubuntu is available to download for free on its official website. You can download it using the link in the Downloads section below.
Downloads
- Virtual Box (Select Windows hosts)
- Ubuntu ISO (Select any version of Ubuntu you want. We will be using Ubuntu 17.10 in this tutorial, however, the steps apply to any version of Ubuntu)
- Virtual Box (Select Windows hosts)
- Ubuntu ISO (Select any version of Ubuntu you want. We will be using Ubuntu 17.10 in this tutorial, however, the steps apply to any version of Ubuntu)
How to Install Ubuntu Virtual Machine on Windows
There are other ways to enjoy dual OS on your Windows PC. One of them is by creating a bootable Ubuntu flash drive and you can learn how to do that by heading over to our tutorial.
Install Virtual Box on your PC. This isn’t exactly a difficult process. Just double-click on the downloaded EXE file and click on Next and Install wherever asked.
Create virtual machine
- Once you have it installed, start Virtual Box and click on the icon that has New under it.
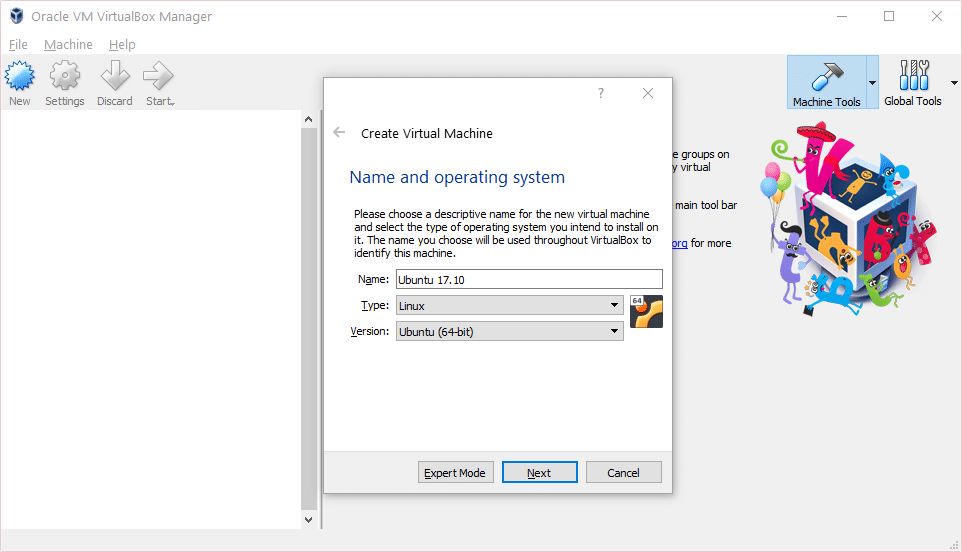
- Virtual Box will already know that you want to install 64-bit Ubuntu Linux because it’s just that good. Give your machine a name and click Next.
- You’ll now be asked to allocate RAM to the machine. Depending on how much RAM you have you can give it anywhere between 2 GB to 4 GB or even 6 GB. Although, 4GB would be more than sufficient. make sure you don’t end up allocating all your RAM because Windows needs some of it too. Click Next when you’ve allocated the RAM.

- Next, you will be asked which method to use to provide a hard disk to the Ubuntu virtual machine. Create a virtual hard disk now is pre-selected, so simply click Create.
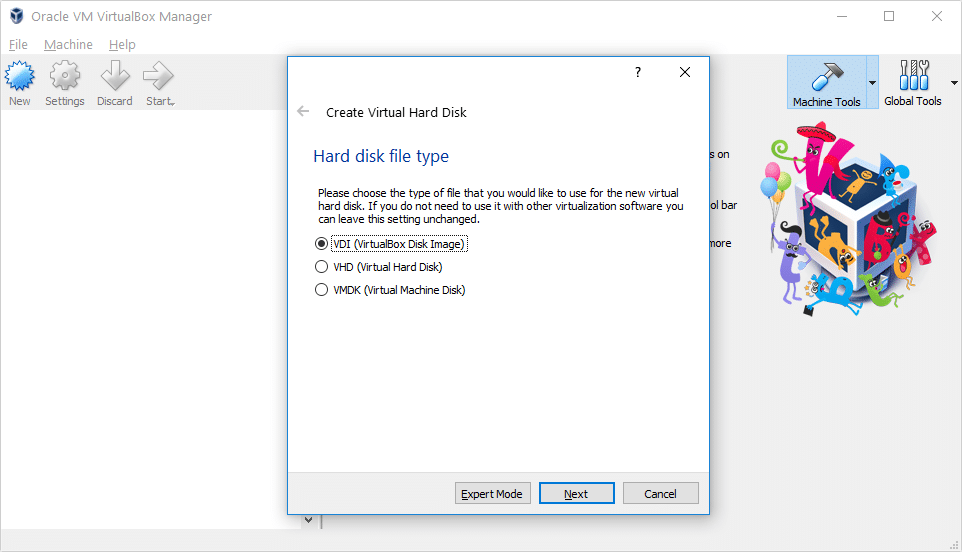
- Since you won’t be using this Virtual Machine with any other software select VDI in the next step and click Next.
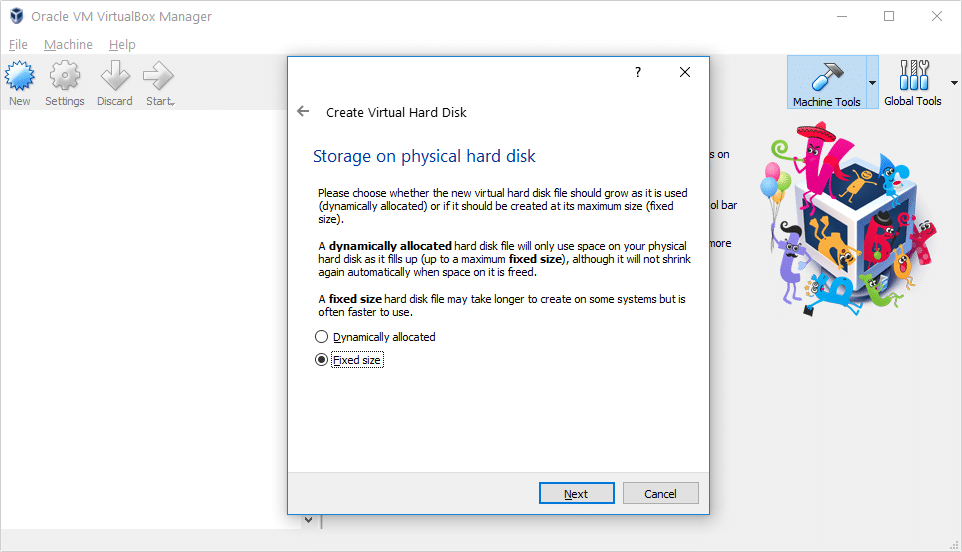
- Now you’ll need to select whether the hard disk is Dynamic allocated or given a Fixed size. What these mean is explained right there and either of the options works fine.
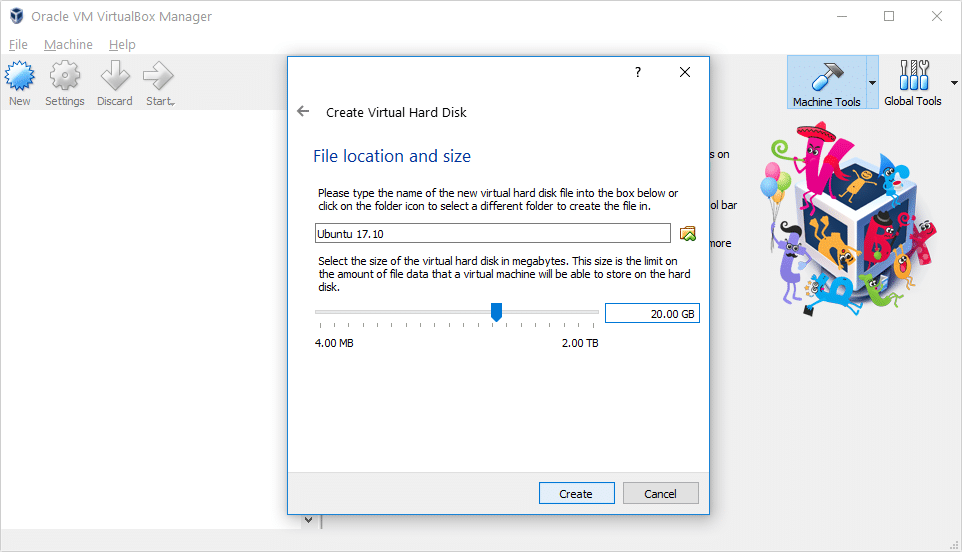
- The 10 GB size recommended by Virtual Box is sufficient, but not enough. If you have enough space available, give it at least 20GB. and click Create. Creating the virtual hard disk can take some time depending on your choices and your hardware.
- Once you have it installed, start Virtual Box and click on the icon that has New under it.
- Virtual Box will already know that you want to install 64-bit Ubuntu Linux because it’s just that good. Give your machine a name and click Next.
- You’ll now be asked to allocate RAM to the machine. Depending on how much RAM you have you can give it anywhere between 2 GB to 4 GB or even 6 GB. Although, 4GB would be more than sufficient. make sure you don’t end up allocating all your RAM because Windows needs some of it too. Click Next when you’ve allocated the RAM.
- Next, you will be asked which method to use to provide a hard disk to the Ubuntu virtual machine. Create a virtual hard disk now is pre-selected, so simply click Create.
- Since you won’t be using this Virtual Machine with any other software select VDI in the next step and click Next.
- Now you’ll need to select whether the hard disk is Dynamic allocated or given a Fixed size. What these mean is explained right there and either of the options works fine.
- The 10 GB size recommended by Virtual Box is sufficient, but not enough. If you have enough space available, give it at least 20GB. and click Create. Creating the virtual hard disk can take some time depending on your choices and your hardware.
- Once you have it installed, start Virtual Box and click on the icon that has New under it.
Install Ubuntu
- Once the virtual machine is created, it is time to load up and install Ubuntu on it. To do this, either double-click on the newly created machine or select it and click the Start button.
- Click on the folder icon and select the downloaded Ubuntu ISO image then click Start.
- The machine will boot up Ubuntu normally as it would boot up on any PC and you can then select whether to Try Ubuntu or Install Ubuntu. Select Install Ubuntu.
- Read the available choices on the next page and check the ones you want, then click Continue.
- Select Erase disk and install Ubuntu in the next step This is safe for the Virtual Machine and will not really wipe anything. Click Install Now and Continue.

- From here on, the steps are quite obvious and self-explanatory and all you have to do is make some choices and click Continue.
- Provide a username and password in the last step and click Continue again. Ubuntu will now be installed on the virtual machine and it can take a while, again, depending on your choices and your hardware.
- Click Restart Now when the installation is complete. If the machine does not automatically restart, just close it and start it again.
Read Next: How to Run Windows Programs on Mac and Linux
- Once the virtual machine is created, it is time to load up and install Ubuntu on it. To do this, either double-click on the newly created machine or select it and click the Start button.
- Click on the folder icon and select the downloaded Ubuntu ISO image then click Start.
- The machine will boot up Ubuntu normally as it would boot up on any PC and you can then select whether to Try Ubuntu or Install Ubuntu. Select Install Ubuntu.
- Read the available choices on the next page and check the ones you want, then click Continue.
- Select Erase disk and install Ubuntu in the next step This is safe for the Virtual Machine and will not really wipe anything. Click Install Now and Continue.
- From here on, the steps are quite obvious and self-explanatory and all you have to do is make some choices and click Continue.
- Provide a username and password in the last step and click Continue again. Ubuntu will now be installed on the virtual machine and it can take a while, again, depending on your choices and your hardware.
- Click Restart Now when the installation is complete. If the machine does not automatically restart, just close it and start it again.
Read Next: How to Run Windows Programs on Mac and Linux
How to Install Ubuntu on VirtualBox: Detailed Overview

Whether you are looking to try out some software, prepare for migration to Linux from Windows or macOS, test applications, network, or otherwise, you need to install Ubuntu on VirtualBox . Installing Ubuntu on VirtualBox as a virtual machine (VM) has a lot of advantages – you can create a snapshot and roll back changes to the appropriate VM state if something goes wrong, clone a VM, copy a VM to another machine easily (all VM data is stored as a set of files), or run a VM on different host operating systems that are supported by VirtualBox.
Today’s blog post explains how to install Ubuntu on VirtualBox. The operating system (OS) runs on a physical machine is referred to as a host OS, and the operating system run on a VM is called a guest OS (Ubuntu in this case). Make sure that VirtualBox is installed on your physical machine before proceeding.
System Configuration of the Host Machine
In order to install Ubuntu on VirtualBox, you should have a physical computer with at least 4 GB of RAM (Random Access Memory), a hard disk drive with at least 30 GB of free space (SSD is preferred due to its higher performance). Your CPU (Central Processor Unit) must support Intel VT-x or AMD-v hardware virtualization features which must also be enabled in UEFI/BIOS. This point is especially important if you are looking for how to install Ubuntu 64-bit on VirtualBox.
In order to install Ubuntu on VirtualBox, you should have a physical computer with at least 4 GB of RAM (Random Access Memory), a hard disk drive with at least 30 GB of free space (SSD is preferred due to its higher performance). Your CPU (Central Processor Unit) must support Intel VT-x or AMD-v hardware virtualization features which must also be enabled in UEFI/BIOS. This point is especially important if you are looking for how to install Ubuntu 64-bit on VirtualBox.
Downloading the Installation Image
You need to download the Ubuntu distribution for installing Ubuntu on VirtualBox. Go to the official Ubuntu website and download the necessary version of the Ubuntu installer. Let’s download Ubuntu 18.04.2 LTS – this is the latest long term support (LTS) Ubuntu version available at this moment. You can find version numbers that are higher than 18.04.2, but they may not offer long term support yet. Five-year support is provided for Ubuntu LTS distributions (both Ubuntu Desktop and Ubuntu Server). Ubuntu LTS is more widely tested, enterprise-focused and compatible with new hardware.
Click the green Download button and save the ISO file to the custom location. In our case, the file name is ubuntu-18.04.2-desktop-amd64.iso. Ubuntu 18 is provided only as 64-bit editions.
Creating a New VM
In order to create a new virtual machine for installing Ubuntu on VirtualBox, open VirtualBox and click New (Machine > New) or press Ctrl+N.

In the Create Virtual Machine screen, set the options for a new VM. In our example of installing Ubuntu on VirtualBox, the new VM options are the following:
Name: Ubuntu18x64
Machine Folder: C:\Virtual\VirtualBox (try to use disk D, E or other non-system partitions if you have them).
Type: Linux
Version: Ubuntu (64-bit)
Memory size: Set at least 1 GB of RAM. As our physical machine used in this example has 16 GB of RAM, we can set 4 GB of RAM for a virtual machine to install Ubuntu on VirtualBox. You should leave enough memory for your host operating system to operate normally.
Select the Create a virtual hard disk now option.
Hit Create to continue.

On the next Create Virtual Hard Disk screen, set the virtual disk file location, for example,
C:\Virtual\VirtualBox\Ubuntu18x64\Ubuntu18x64.vdi
The file size of the virtual disk: 20 GB or more.
Hard disk file type: VDI (VirtualBox Disk Image). Let’s select the native VirtualBox virtual disk format.
Storage on physical hard disk: Dynamically allocated. This option allows you to save space on your physical disk until the virtual disk grows to its maximum allocated size.
Hit Create to finish creating a new VM to install Ubuntu on VirtualBox.

In order to create a new virtual machine for installing Ubuntu on VirtualBox, open VirtualBox and click New (Machine > New) or press Ctrl+N.
In the Create Virtual Machine screen, set the options for a new VM. In our example of installing Ubuntu on VirtualBox, the new VM options are the following:
Name: Ubuntu18x64
Machine Folder: C:\Virtual\VirtualBox (try to use disk D, E or other non-system partitions if you have them).
Type: Linux
Version: Ubuntu (64-bit)
Memory size: Set at least 1 GB of RAM. As our physical machine used in this example has 16 GB of RAM, we can set 4 GB of RAM for a virtual machine to install Ubuntu on VirtualBox. You should leave enough memory for your host operating system to operate normally.
Select the Create a virtual hard disk now option.
Hit Create to continue.
On the next Create Virtual Hard Disk screen, set the virtual disk file location, for example,
C:\Virtual\VirtualBox\Ubuntu18x64\Ubuntu18x64.vdi
The file size of the virtual disk: 20 GB or more.
Hard disk file type: VDI (VirtualBox Disk Image). Let’s select the native VirtualBox virtual disk format.
Storage on physical hard disk: Dynamically allocated. This option allows you to save space on your physical disk until the virtual disk grows to its maximum allocated size.
Hit Create to finish creating a new VM to install Ubuntu on VirtualBox.
VM Configuration
A new virtual machine to install Ubuntu on VirtualBox has now been created and its name is displayed in the list of VMs in the main VirtualBox window. You need to edit VM settings after VM creation. Select your new VM (Ubuntu18x64 in this case) and click Settings (Machine > Settings or press Ctrl+S).

In the Settings window, go to the Display section and select the Screen tab. Set video memory to 128 MB. Otherwise the Ubuntu installer may hang on some installation steps, keyboard may not response etc. You can enable 3D acceleration.
Hit OK to save settings.

A new virtual machine to install Ubuntu on VirtualBox has now been created and its name is displayed in the list of VMs in the main VirtualBox window. You need to edit VM settings after VM creation. Select your new VM (Ubuntu18x64 in this case) and click Settings (Machine > Settings or press Ctrl+S).
In the Settings window, go to the Display section and select the Screen tab. Set video memory to 128 MB. Otherwise the Ubuntu installer may hang on some installation steps, keyboard may not response etc. You can enable 3D acceleration.
Hit OK to save settings.
Select the Boot Disk Image
You don’t need to burn the ISO image onto a DVD disk as you would for installing an operating system on a physical machine. You can mount the ISO image to the virtual DVD drive of the virtual machine and boot a VM from this media. Let’s insert the ubuntu-18.04.2-desktop-amd64.iso image that was downloaded from the official Ubuntu web site before, into a virtual DVD drive of the Ubuntu18x64 VM. Open your VM settings and go to the Storage section. Select your virtual controller used for connecting a virtual DVD drive (by default a virtual DVD drive is empty). Click the Empty status and in the right pane near the IDE Secondary Master, click the disc icon. In the menu that appears, click Choose Virtual Optical Disk File and browse your Ubuntu installation ISO image file (ubuntu-18.04.2-desktop-amd64.iso).
Hit OK to save settings. Now your VM is ready to install Ubuntu on VirtualBox.
How to Install Ubuntu on VirtualBox VMs
Once the new VM is prepared for installing Ubuntu on VirtualBox, start the VM (Machine > Start). The VM boots from the ISO Ubuntu installation image. The first screen that you can see after booting is the Welcome screen.
In the left pane select Language for displaying information in the installer interface. English is selected in the current example. Then click Install Ubuntu.

Keyboard layout. Choose your keyboard layout. Let’s select English (US).

Updates and other software. There are a few options to choose from on this screen.
Normal installation. A web browser, utilities, office applications and media players are installed.
Minimal installation. Only the main components including a web browser and basic utilities are installed.
Let’s select the normal installation.
Other options:
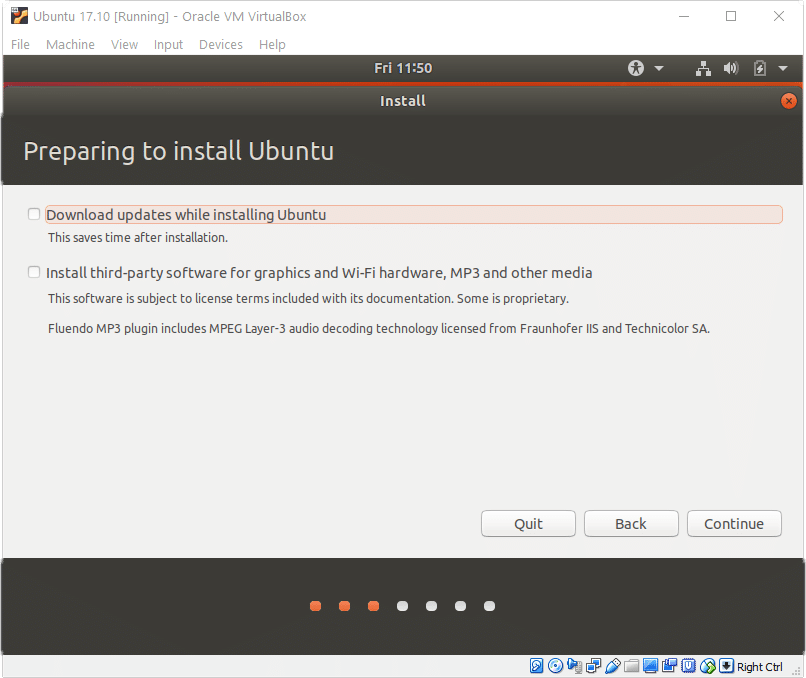
Download updates while installing Ubuntu. The Ubuntu team is always working towards making Linux better. That’s why after downloading the installer, some updates may be already available. You can automatically download and install updates right during Ubuntu installation, letting you save time after OS installation. Let’s select this option.
Install third-party software for graphics and Wi-Fi hardware and additional media formats. Tick this checkbox if you would like to install additional software, such as proprietary Wi-Fi drivers, video drivers, some TTF fonts etc.
Installation type. This screen contains options for preparing a disk for Ubuntu installation.
Erase disk and install Ubuntu. This is the default option. All disk space will be automatically allocated to Ubuntu. If you select Erase disk and install Ubuntu on VirtualBox VMs, one big /dev/sda1 partition is created on /dev/sda. This /dev/sda1 partition with ext4 file system is mounted to the / directory (root directory), though a separate swap partition is not created. Attention: All data on the virtual disk will be erased—there is no reason to worry about it, however, because an empty virtual disk created previously is being used for installing Ubuntu on VirtualBox.
There are some additional options:
- Encrypt the new Ubuntu installation for security.
- Use LVM (Logical Volume Management) with the new Ubuntu installation.
Something else. Use this option for manual creation of the partition table on your virtual disk which is used to install Ubuntu on VirtualBox.
Click Install Now when you are ready to continue. Then on the confirmation screen, hit Continue.
Where are you? Select your location to set the time zone and regional settings. The time for your selected region will be set automatically. Let’s select London.
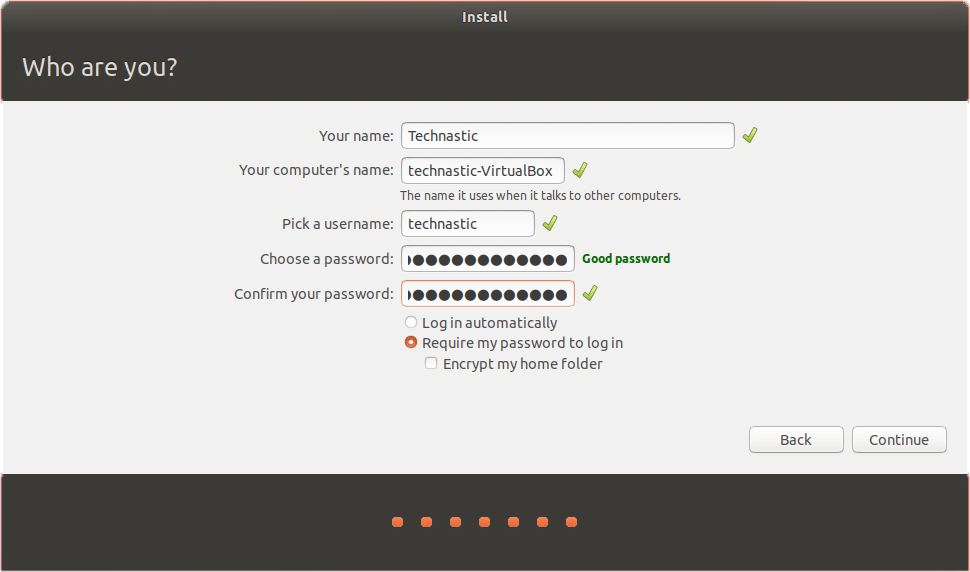
Who are you? Enter your user name, computer’s name, and set the password. Select Require my password to log in for a higher level of security. In our example, the username is user1 and the computer’s name is ubuntu18-vm.
As you can see, useful tips are displayed on the screen during the installation process.
When installation is complete, you will see a notification window. You have to restart your VM with Ubuntu on VirtualBox.

Now you can eject the Ubuntu installation ISO disk from the virtual CD/DVD drive of the VM.
Once the new VM is prepared for installing Ubuntu on VirtualBox, start the VM (Machine > Start). The VM boots from the ISO Ubuntu installation image. The first screen that you can see after booting is the Welcome screen.
In the left pane select Language for displaying information in the installer interface. English is selected in the current example. Then click Install Ubuntu.
Keyboard layout. Choose your keyboard layout. Let’s select English (US).
Updates and other software. There are a few options to choose from on this screen.
Normal installation. A web browser, utilities, office applications and media players are installed.
Minimal installation. Only the main components including a web browser and basic utilities are installed.
Let’s select the normal installation.
Other options:
Download updates while installing Ubuntu. The Ubuntu team is always working towards making Linux better. That’s why after downloading the installer, some updates may be already available. You can automatically download and install updates right during Ubuntu installation, letting you save time after OS installation. Let’s select this option.
Install third-party software for graphics and Wi-Fi hardware and additional media formats. Tick this checkbox if you would like to install additional software, such as proprietary Wi-Fi drivers, video drivers, some TTF fonts etc.
Installation type. This screen contains options for preparing a disk for Ubuntu installation.
Erase disk and install Ubuntu. This is the default option. All disk space will be automatically allocated to Ubuntu. If you select Erase disk and install Ubuntu on VirtualBox VMs, one big /dev/sda1 partition is created on /dev/sda. This /dev/sda1 partition with ext4 file system is mounted to the / directory (root directory), though a separate swap partition is not created. Attention: All data on the virtual disk will be erased—there is no reason to worry about it, however, because an empty virtual disk created previously is being used for installing Ubuntu on VirtualBox.
There are some additional options:
- Encrypt the new Ubuntu installation for security.
- Use LVM (Logical Volume Management) with the new Ubuntu installation.
Something else. Use this option for manual creation of the partition table on your virtual disk which is used to install Ubuntu on VirtualBox.
Click Install Now when you are ready to continue. Then on the confirmation screen, hit Continue.
Where are you? Select your location to set the time zone and regional settings. The time for your selected region will be set automatically. Let’s select London.
Who are you? Enter your user name, computer’s name, and set the password. Select Require my password to log in for a higher level of security. In our example, the username is user1 and the computer’s name is ubuntu18-vm.
As you can see, useful tips are displayed on the screen during the installation process.
When installation is complete, you will see a notification window. You have to restart your VM with Ubuntu on VirtualBox.
Now you can eject the Ubuntu installation ISO disk from the virtual CD/DVD drive of the VM.


Installing VirtualBox Guest Additions
One final step is left to complete installing Ubuntu on VirtualBox. After the operating system reboot, install VirtualBox Guest Additions, which is a set of drivers and system utilities intended to improve usability and VM performance as well as tight integration with a host OS.
In the VM window, go to Devices and hit Insert Guest Additions CD image. The ISO disc image that is located in the VirtualBox installation directory will be inserted into a virtual CD/DVD drive of the VM. After that, you can see a CD shortcut on the Ubuntu Desktop. The ISO disk contains autorun, and the Guest Additions installer can be started automatically. Just hit the Run button to start installing VirtualBox Guest Additions.

If you get the warning message “Please install the gcc make perl packages”, it means that you have to install these packages first and then install VirtualBox Guest Additions.

In order to install the necessary packages, execute the command:
sudo apt-get install build-essential gcc make perl dkms
You may need to type admin credentials when using sudo.
After that, reboot your Ubuntu VM:
init 6
After restarting the VM, open Linux terminal and go to the directory of the virtual CD with Guest Additions. In our case, the following command is used:
cd /media/user1/VBox_GAs_6.0.8/
Check the contents of the directory:
ls -al
Run the Linux installer of VirtualBox Guest Additions on your Ubuntu on VirtualBox manually:
sudo ./VBoxLinuxAdditions.run

When the installation process is finished, verify whether VirtualBox Guest Additions have been installed successfully. Let’s check the appropriate kernel modules that are installed with Guest Additions:
lsmod | grep -I vbox
Check the module information:
modinfo vboxguest
You can check only version of VirtualBox Guest Additions:
lsmod | grep -io vboxguest | xargs modinfo | grep -iw version

Now you know how to install Ubuntu on VirtualBox. It is also recommended that you install VirtualBox Extension Pack onto your host machine. Read also our blog post on how to use VirtualBox and configure shared folders, shared clipboard, create snapshots etc.
One final step is left to complete installing Ubuntu on VirtualBox. After the operating system reboot, install VirtualBox Guest Additions, which is a set of drivers and system utilities intended to improve usability and VM performance as well as tight integration with a host OS.
In the VM window, go to Devices and hit Insert Guest Additions CD image. The ISO disc image that is located in the VirtualBox installation directory will be inserted into a virtual CD/DVD drive of the VM. After that, you can see a CD shortcut on the Ubuntu Desktop. The ISO disk contains autorun, and the Guest Additions installer can be started automatically. Just hit the Run button to start installing VirtualBox Guest Additions.
If you get the warning message “Please install the gcc make perl packages”, it means that you have to install these packages first and then install VirtualBox Guest Additions.
In order to install the necessary packages, execute the command:
sudo apt-get install build-essential gcc make perl dkms
You may need to type admin credentials when using sudo.
After that, reboot your Ubuntu VM:
init 6
After restarting the VM, open Linux terminal and go to the directory of the virtual CD with Guest Additions. In our case, the following command is used:
cd /media/user1/VBox_GAs_6.0.8/
Check the contents of the directory:
ls -al
Run the Linux installer of VirtualBox Guest Additions on your Ubuntu on VirtualBox manually:
sudo ./VBoxLinuxAdditions.run
When the installation process is finished, verify whether VirtualBox Guest Additions have been installed successfully. Let’s check the appropriate kernel modules that are installed with Guest Additions:
lsmod | grep -I vbox
Check the module information:
modinfo vboxguest
You can check only version of VirtualBox Guest Additions:
lsmod | grep -io vboxguest | xargs modinfo | grep -iw version
Now you know how to install Ubuntu on VirtualBox. It is also recommended that you install VirtualBox Extension Pack onto your host machine. Read also our blog post on how to use VirtualBox and configure shared folders, shared clipboard, create snapshots etc.

Conclusion
Today’s blog post explained how to install Ubuntu on VirtualBox. This process is not difficult – you should create a new VM, configure that VM, select a boot disk ISO image and boot from that installation image. Further installation process of Ubuntu on a VirtualBox VM is similar to installing Ubuntu on a physical machine. After installing Ubuntu on VirtualBox, don’t forget to install VirtualBox Guest Additions on a guest OS and VirtualBox Extension Pack on a host OS to unlock extra features, improve performance and user experience.
Today’s blog post explained how to install Ubuntu on VirtualBox. This process is not difficult – you should create a new VM, configure that VM, select a boot disk ISO image and boot from that installation image. Further installation process of Ubuntu on a VirtualBox VM is similar to installing Ubuntu on a physical machine. After installing Ubuntu on VirtualBox, don’t forget to install VirtualBox Guest Additions on a guest OS and VirtualBox Extension Pack on a host OS to unlock extra features, improve performance and user experience.
- Get link
- X
- Other Apps


Comments
Post a Comment